Procedure
01) Create a Loader using the M3D_Materials\Footage\M3D_Logo footage.
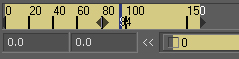
02) Drag the Loader to the time bar on the bottom of the screen to set the render range. Show the Loader in the left view, and play through the whole sequence one time.
03) Add a Merge tool after the Loader. Be sure that the Loader is going into the background (gold) input on the Merge.
04) Create a pEmitter tool, followed by a pRender tool. Connect the output of the pRender tool to the foreground (green) input of the Merge tool.
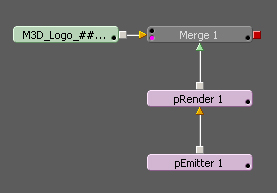
05) Select the pRender tool and click on the Controls tab. Check the Generate Z Buffer option. Also select the Merge tool and click on the Channels tab. Make sure Perform Depth Merge is selected. These options are necessary to merge the M3D_Logo footage with the rendered particles correctly.
06) Bring the Merge tool up on the right view.
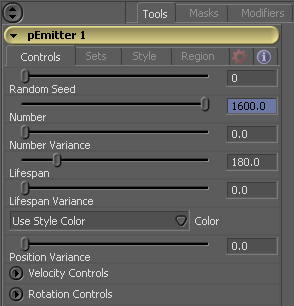
07) Go to frame 0, select the pEmitter tool, and set the Number to 1600. Set the Lifespan to 180. Animate the Number property. Go to frame 1 and decrease the Number to 0.
08) From this point on, you can let the flow play back in a loop as to see the effects of each step as they are being completed.
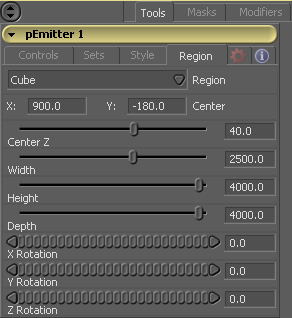
09) On the pEmitter tool, select the Region tab and change the Region to a Cube. Set the following values based on the Lightwave scene used to create the M3D_Logo footage: X=900 | Y=-180 | CenterZ=40 | Width=2500 | Height=4000 | Depth=4000.
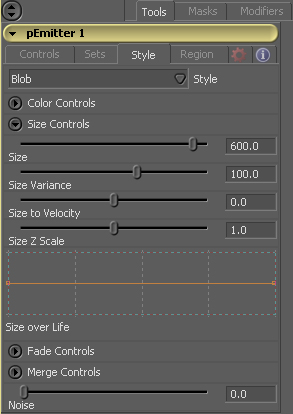
10) Click on the Style tab and change the Style to Blob. Open the Size Controls Drop down. Set the size to 600 and the Size Variance to 100.
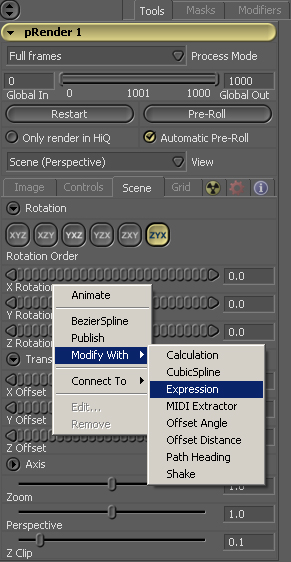
11) Select the pRender tool and click on the Scene tab. Open the Rotation and Translation drop downs.
12) Right click on the X Rotation and select Modify With-->Expression. Repeat this for the Y/Z rotations and the X/Y/Z offsets.
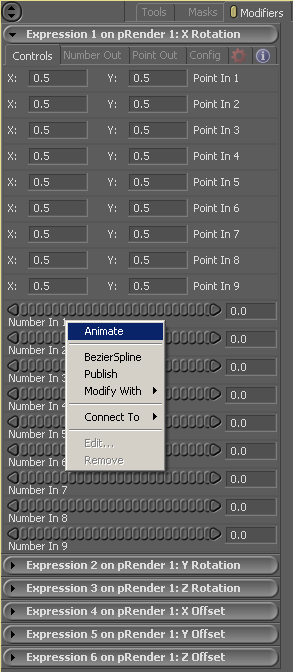
13) Click on the Modifiers tab. Open up the X Rotation expression. Animate the Number In 1 property. Repeat this process for all of the other expressions.
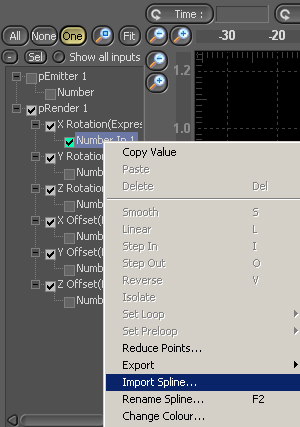
14) Click on the Spline tab. Click on the "One" button to view only one spline at a time. Select the pRender-->X Rotation-->Number 1 spline. Right click on it and select Import Spline. Pick the Cam_X_Rot.spl file under the M3D_Materials\Splines folder. Repeat this process for the rest of the Number In splines.
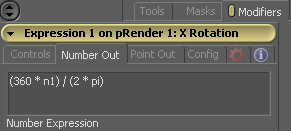
15) Once all of the splines are imported, select the Modifiers tab on the pRender tool again. Start with the X Rotation Expression. Select the Number Out tab. Type (360 * n1) / (2 * pi) in the box. This will convert the radian values given from Lightwave into degree values for use with Fusion. Repeat this for the other rotation expressions.
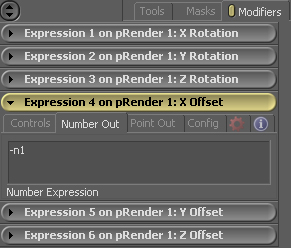
16) Select the X Offset expression. Select the Number Out tab. Type -n1 in the box. This will invert the splines given from Lightwave for use with Fusion. Do this also with the Z Offset expression. For the Y Offset expression, just type n1 in the box without the minus sign because this spline does not need to be inverted.
17) That's basically it! At this point, it should look like the particles were included in the original Lightwave render!
|


